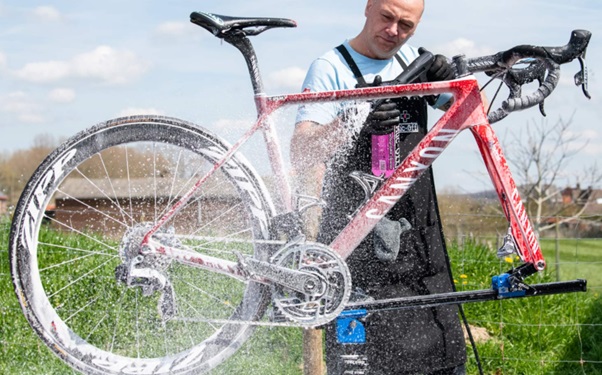
There are often two types of riders; the one that never cleans their bike and the one whose bike is their pride and joy. Whichever you are, this handy guide will give you some forgotten tips on how to properly clean your machine and dispel some dirty myths. First of all, sorry to the non-cleaners, but cleaning your bike will 100% ensure it runs smoother, lasts longer and looks better. No matter how proud you are of the mud you’ve accumulated – although kudos for that hard-earned grime!
Cleaning your bike can be fun. Just some quiet one-on-one time making the frame shine. Now, we can understand if you simply don’t know where to start on the old girl. Modern bikes have more components than you can shake a stick at but let us get started by telling you where to begin and what you need.
The Essentials
Water: A bucket or garden hose will do just fine. Pressure washers are loved by some and loathed by others. Our advice? Reduce the pressure if you can or stand well back. You don’t want to soak your bearings or force dirt past seals.
Bike wash fluid: This will not only clean but protect your frame if you wash often.
Brush: A toothbrush will work, but it’ll take you hours. Invest in a cheap bike wash brush kit for optimal cleaning. Rags will also come in handy
Degreaser and lube: Please look after that chain and drivetrain. It’s worth it.
Workstand: These will make your life so much easier when cleaning and maintaining your bike.
Something to dry your bike at the end too will give you a nice sparkly finish.
How to Clean Your Bike
Step 1: Drivetrain
Always start here as your drivetrain and chain will be the dirtiest. These components get filthy because dirt and oil mix together. Have a separate rag or brush for this component and backpedal to move your chain as you hold the rag or brush against it.
Step 2: Rinse and apply bike cleaner fluid
Rinse your frame, handlebars, wheels, seat/seat post, forks with warm water to remove the outer layer of dirt and then apply your cleaner fluid which usually needs a few minutes to soak and activate.
Step 3: Wipe brake surfaces
In the meantime, wipe down your disc brakes or rim brakes (and rims) as these will undoubtedly have amassed some dirt. Be gentle and don’t use much water. Special wipes or a damp cloth with a drop of degreaser should do the trick.
Step 4: Brush clean
Using your new bike brush kit to scrub down from top to bottom, avoiding your chain. This ensures you keep the frame clean from oil. Tricky areas to reach include; under the saddle, your inner forks and the corners of your frame. An old rag is very useful for threading behind tight areas such as the crankset and front derailleur. Removing your wheels is a pro-tip for cleaning so you don’t miss a spot.
Step 5: Rinse
Rinse any remaining muck and soap off the bike using fresh water. After reattaching your wheels, which you’ve also cleaned, spin them to rid water from the tread. Check all the dirt has been lifted off and revisit with the brush if any remains, then rinse again if necessary.
Step 6: Dry
Drying is usually an afterthought, but failing to do so will leave you with unsightly water stains after your hard work. If you want a gleaming finish, we highly recommend waxing your frame which not only leaves your bike looking pretty but will stop dirt sticking to it which means less cleaning in the future.
Step 7: Lube
The final step is applying dry lube to your chain. Read the instructions for application and remember; less is more. Don’t overdo it with lube – it’ll attract more dirt. Slowly backpedal as you apply and wipe off any excess with a clean rag.
That’s it! Enjoy your clean bike and we’ll see you out on the road or trails soon.